Lottie 动画原理剖析

Lottie 是什么

Lottie 是 Airbnb 开源的一个动画渲染库,它可以解析 Adobe After Effects 使用 Bodymovin 插件把做的动画导出的 json 文件,并在 Android/iOS、React Native 和 web 端实现相同的动画效果。

Lottie介绍

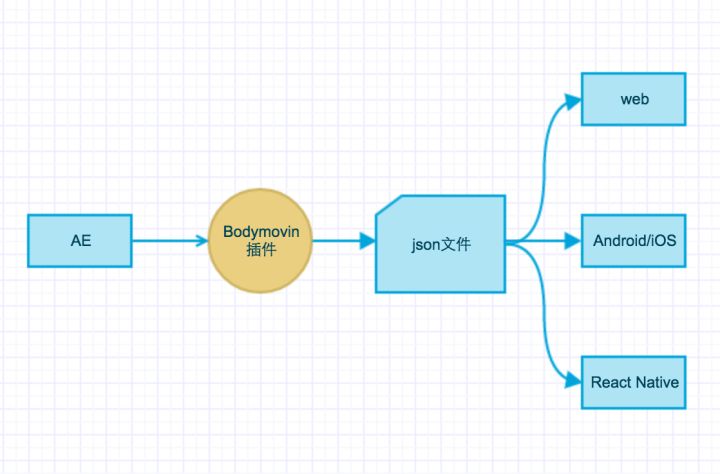
简单来说,设计师可以使用 After Effects 制作动画,经由 Lottie 便可以很简单的在移动端/ web 端渲染,不再需要工程师进行大量的手动实现。俗话说“一图胜千言”,如下动画便是由 Lottie 渲染。

Introduction_00_sm

为什么要用 Lottie

1、对设计:做的动画素材想一次设计,各个平台能直接运行,效果可由自己灵活掌控,减少于开发的调整沟通。

2、对开发:针对设计越来越复杂的动画,比如上图所示,可以解决的方案有:

  • png 序列帧:它需要大量的图片素材支持,在进行动画播放时会占用很多内存。
  • 视频:没有交互,只能等视频播放完毕才能交互。

需要一种更好的解决方案,能够以比较低的成本,来实现这些复杂动画。

3、对运营:动画实现可配置,不同时间想有不同的动画效果,而目前支持的动画都是需要跟版本的。

使用 Lottie ,这一切问题就迎刃而解了。Lottie 只需要解析导出的 JSON 文件及所需要的图片,就能在各个平台上实现相同的动画效果,它实现成本低,上线后只需要动态替换对应的 JSON 文件就能实现可配置、可运营。

怎么使用 Lottie

Lottie 在不同平台上分别实现了类库:

得益于 Lottie 封装的很好, Android 侧使用也是非常简单的,使用如下所示:
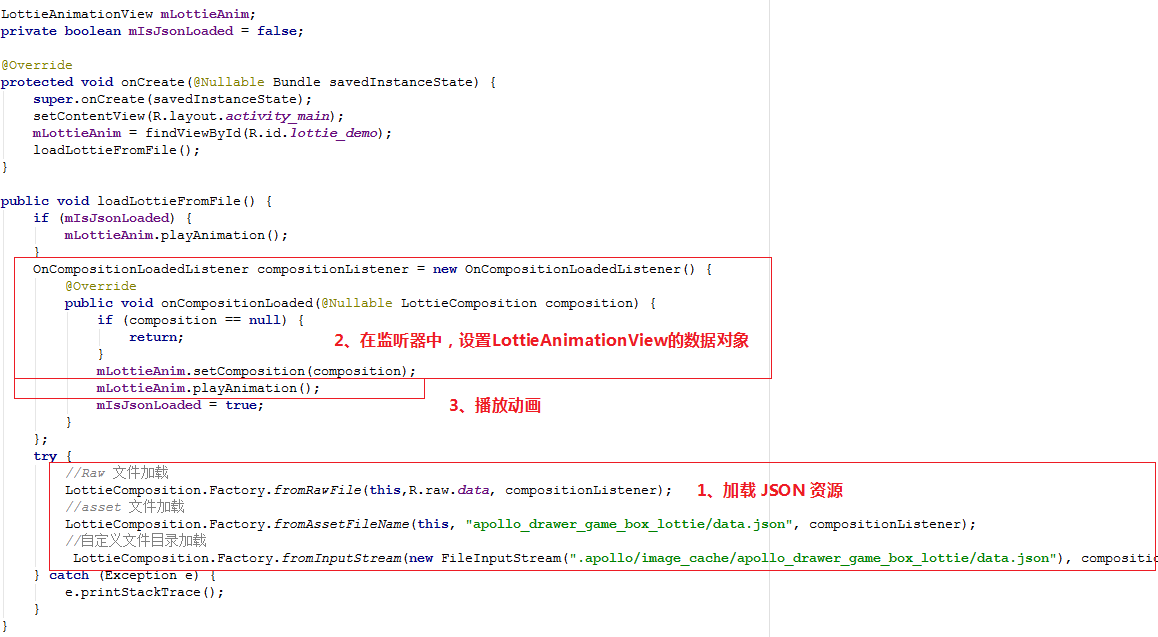
Lottie使用

1、加载资源

Adobe After Effects 导出的 JSON 文件,可以放在 /assets/,/raw/,或自定义的目录中,如下方式加载:

1
2
3
4
5
6
//Raw 文件加载
LottieComposition.Factory.fromRawFile(this,R.raw.data, compositionListener);
//asset 文件加载
LottieComposition.Factory.fromAssetFileName(this, "data.json", compositionListener);
//自定义文件目录加载
LottieComposition.Factory.fromInputStream(new FileInputStream("/sdcard/data/data.json"), compositionListener);

2、设置数据对象

创建一个 OnCompositionLoadedListener,放入加载的监听中,等待加载完成后,会返回一个数据对象 LottieComposition,接下来只要为 LottieAnimationView 设置这个数据对象即可。

1
2
3
4
5
6
7
8
9
OnCompositionLoadedListener compositionListener = new OnCompositionLoadedListener() {
@Override
public void onCompositionLoaded(@Nullable LottieComposition composition) {
if (composition == null) {
return;
}
mLottieAnim.setComposition(composition);
}
};

3、播放动画

接下来调用 LottieAnimationView.playAnimation() 就可以播放动画了。

1
mLottieAnim.playAnimation();

4、设置图片/字体代理

图片默认认为是在 /assets/ 目录的,如果图片放在这个根目录,其子目录只需要调用mLottieAnim.setImageAssetsFolder(); 就可以正确读取到,如果是自定义的图片,则可以设置个图片代理,如下所示:

1
2
3
4
5
6
7
8
9
10
11
12
mLottieAnim.setImageAssetDelegate(new ImageAssetDelegate() {
@Override
public Bitmap fetchBitmap(LottieImageAsset asset) {
try {
FileInputStream fileInputStream = new FileInputStream("/sdcard/data/images/" + asset.getFileName());
return BitmapFactory.decodeStream(fileInputStream);
} catch (Exception e) {
e.printStackTrace();
}
return null;
}
});

asset.getFileName 是 JSON 中所需要图片的名称,这里可以直接拼接一个自定义路径,decode 获取 bitmap 返回。

如果有涉及到字体,可以和图片一样,设置字体的 delegate,自定义获取。

Lottie 动画实现原理

Lottie总览

Lottie 先将动画 JSON 文件转换为 LottieComposition 数据对象,继承 ImageView 的 LottieAnimationView 将数据对象 LottieComposition 和渲染能力委托给 LottieDrawable 处理,在 LottieDrawable 中会将数据对象 LottieComposition 组建为具有 draw 能力的 BaseLayer,并在 LottieAnimationView 需要绘制时,调用自己和各个层级 BaseLayer 的渲染,从而达到动画效果。

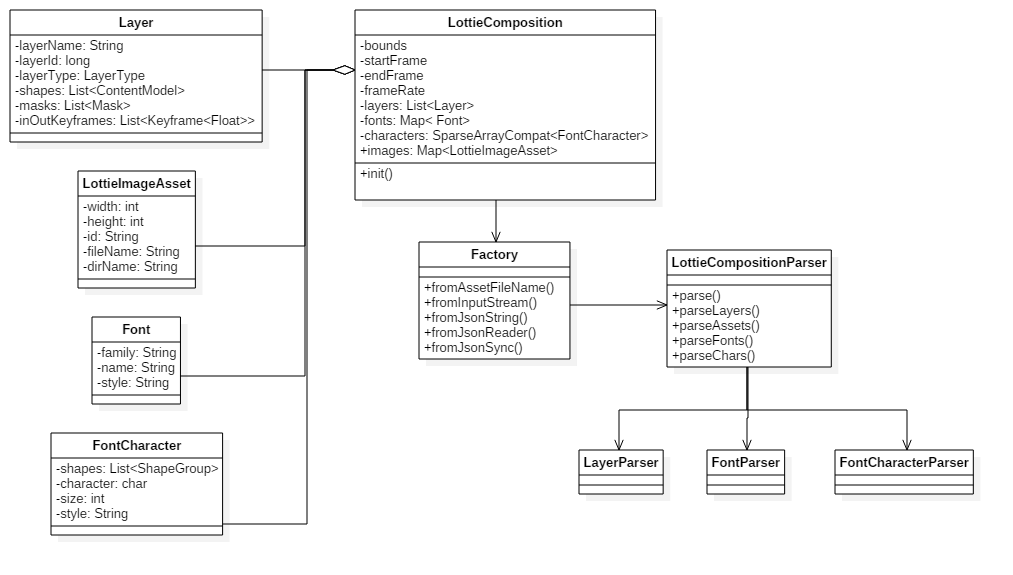
从 Json 到 LottieCompisition 数据对象

Lottie 的第一步就是去解析 AE 动画文件导出的 Json ,转变为 Java 实体对象。以上便是解析过程中涉及的类图:

Lottie解析Json

同步/异步加载 Json 数据

Lottie_加载

在 LottieComposition.Factory 工厂类中,利用简单工厂模式,支持多种加载 Json 资源方式,最终都是通过 InputStream 流传入,再用 JsonReader 传入 LottieCompositionParser.parse 进行解析,返回完整的数据对象 LottieComposition。

这里支持同步/异步俩种方式加载,对于异步,会使用 AsyncCompositionLoader 异步调用 fromJsonSync 解析。俩者均使用 JsonReader 从流中解析 json 数据,可以避免了因一次性将全部 json 数据加载到内存之中而带来的 OOM 问题。

Json 解析

对于 AE 通过 bodymovin 插件导出来的 Json,里边包含做动画的一切信息,包括帧率、动画形态、图层、字体等等,接下来介绍一下 Json 动画描述文件的一些属性。

解析外部资源
1
2
3
4
5
6
7
8
9
10
11
12
{
"v": "5.1.10", //bodymovin的版本
"fr": 24, //帧率
"ip": 0, //起始关键帧
"op": 277, //结束关键帧
"w": 110, //动画宽度
"h": 110, //动画高度
"nm": "合成 2",
"ddd": 0,
"assets": [...] //资源信息
"layers": [...] //图层信息
}

在最外层中,可以获取插件 bodymovin 的版本号,起始关键帧,动画帧率及动画的宽高等属性。

解析图片资源
1
2
3
4
5
6
7
{
"id": "image_0", //图片id
"w": 750, //图片宽度
"h": 1334, //图片高度
"u": "images/", //图片路径
"p": "img_0.png" //图片名称
}

图片资源是在 “asset” 里边的,可以有多张图片,每张图片数据解析后会转换为实体类 LottieImageAsset

解析图层
1
2
3
4
5
6
7
8
9
10
11
12
13
14
15
16
17
18
19
20
21
22
23
24
"layers": [
{
"ddd": 0,
"ind": 1, //图层 id
"ty": 2, //图层类型
"nm": "eye-right 2",
"parent": 3,
"refId": "image_0", //引用资源Id
"sr": 1,
"ks": { //动画属性值
"s": { //s:缩放的数据值
"a": 0,
"k": [
100,
100,
100
],
"ix": 6
}...},
"ip": 0, //inFrame 该图层起始关键帧
"op": 241, //outFrame 该图层结束关键帧
"st": 0, //startFrame 开始关键帧
"bm": 0
},

一张复杂的图片可以使用多个图层来表示,每个图层展示一部分内容,图层中的内容也可以拆分为多个元素。在 Lottie 解析的 Json 中,图层可以分为以下几种:PreComp,Solid,Image,Null,Shape,Text。在数据解析时,先会转换为数据实体类 Layer,根据 type 来区分是哪种图层。

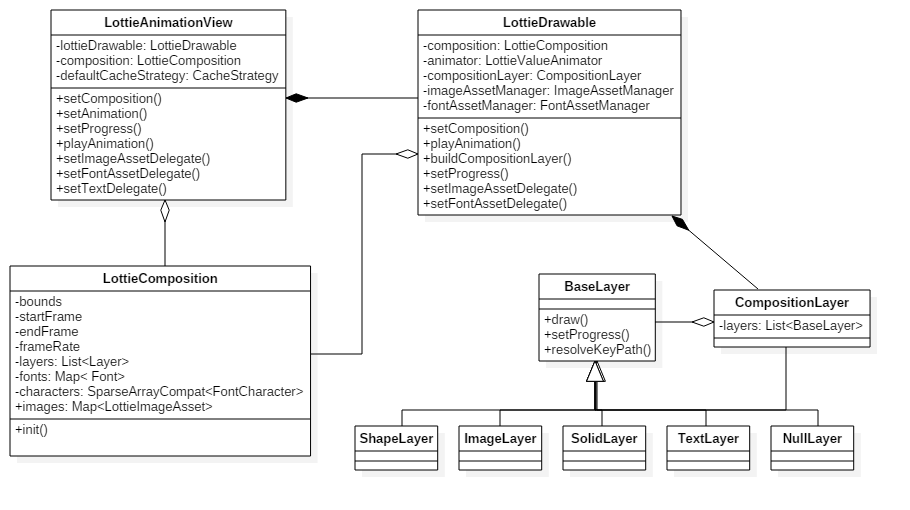
从 LottieCompisition 到 CompositionLayer

使用 Lottie 第二步是设置数据对象 LottieComposition,把数据对象的数据转换为具有绘制能力的 BaseLayer,以下是转换的部分类图:

Lottie组建图层

setComposition

在设置数据对象时,我们使用了 mLottieAnim.setComposition(composition); 可以看到源码这里是直接委托给了 LottieDrawable,把 LottieComposition 传了下去。

1
2
3
4
5
6
7
8
9
public void setComposition(@NonNull LottieComposition composition) {
if (L.DBG) {
Log.v(TAG, "Set Composition \n" + composition);
}
lottieDrawable.setCallback(this);

this.composition = composition;
boolean isNewComposition = lottieDrawable.setComposition(composition);
}

在 LottieDrawable 中,可以看到调用 buildCompositionLayer 进行构造一个最外层的 CompositionLayer。

1
2
3
4
5
6
7
8
9
10
11
12
13
14
15
16
17
18
19
20
21
22
23
24
25
26
27
28
29
30
31
32
public boolean setComposition(LottieComposition composition) {
if (this.composition == composition) {
return false;
}

clearComposition();
this.composition = composition;
buildCompositionLayer();
animator.setComposition(composition);
setProgress(animator.getAnimatedFraction());
setScale(scale);
updateBounds();

// We copy the tasks to a new ArrayList so that if this method is called from multiple threads,
// then there won't be two iterators iterating and removing at the same time.
Iterator<LazyCompositionTask> it = new ArrayList<>(lazyCompositionTasks).iterator();
while (it.hasNext()) {
LazyCompositionTask t = it.next();
t.run(composition);
it.remove();
}
lazyCompositionTasks.clear();

composition.setPerformanceTrackingEnabled(performanceTrackingEnabled);

return true;
}

private void buildCompositionLayer() {
compositionLayer = new CompositionLayer(
this, LayerParser.parse(composition), composition.getLayers(), composition);
}

构造 CompositionLayer 时,遍历了一下 LottieComposition 数据对象中包含的所有图层 Layer 数据,将 Layer 数据对象转换为图层对象 BaseLayer。

1
2
3
4
5
6
7
8
9
10
11
12
13
14
public CompositionLayer(LottieDrawable lottieDrawable, Layer layerModel, List<Layer> layerModels,
LottieComposition composition) {
super(lottieDrawable, layerModel);

LongSparseArray<BaseLayer> layerMap =
new LongSparseArray<>(composition.getLayers().size());

BaseLayer mattedLayer = null;
for (int i = layerModels.size() - 1; i >= 0; i--) {
Layer lm = layerModels.get(i);
BaseLayer layer = BaseLayer.forModel(lm, lottieDrawable, composition);
}

}

转换过程中,根据在 Json 中支持的图层类别:PreComp,Solid,Image,Null,Shape,Tex,分别创建继承 BaseLayer 的 CompositionLayer,SolidLayer,ImageLayer,NullLayer,ShpeLayer,TextLayer。

1
2
3
4
5
6
7
8
9
10
11
12
13
14
15
16
17
18
19
20
21
22
23
static BaseLayer forModel(
Layer layerModel, LottieDrawable drawable, LottieComposition composition) {
switch (layerModel.getLayerType()) {
case Shape:
return new ShapeLayer(drawable, layerModel);
case PreComp:
return new CompositionLayer(drawable, layerModel,
composition.getPrecomps(layerModel.getRefId()), composition);
case Solid:
return new SolidLayer(drawable, layerModel);
case Image:
return new ImageLayer(drawable, layerModel);
case Null:
return new NullLayer(drawable, layerModel);
case Text:
return new TextLayer(drawable, layerModel);
case Unknown:
default:
// Do nothing
L.warn("Unknown layer type " + layerModel.getLayerType());
return null;
}
}
图层的包含关系

CompositionLayer 与其他 BaseLayer 的关系可以用 ViewGroup 和 View 来比喻。

Lottie_CompositionLayer

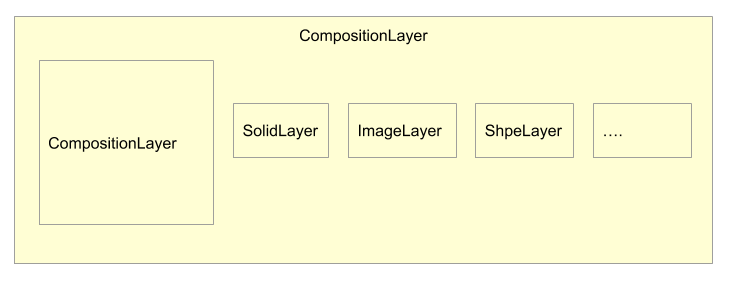
将数据对象 LottieComposition 转换为 BaseLayer 时,会创建一个顶级的 CompositionLayer,来容纳 Json 动画中描述的所有图层。当然,如果在转换复合图层 PreComp 到 CompositionLayer 时,如果这里边还包含其他图层,也会类似这样,把其子图层放入进来。

播放动画

使用 Lottie 的第三步就是调用 LottieAnimationView.playAnimation() 播放动画了,它的调用时序图如下所示:
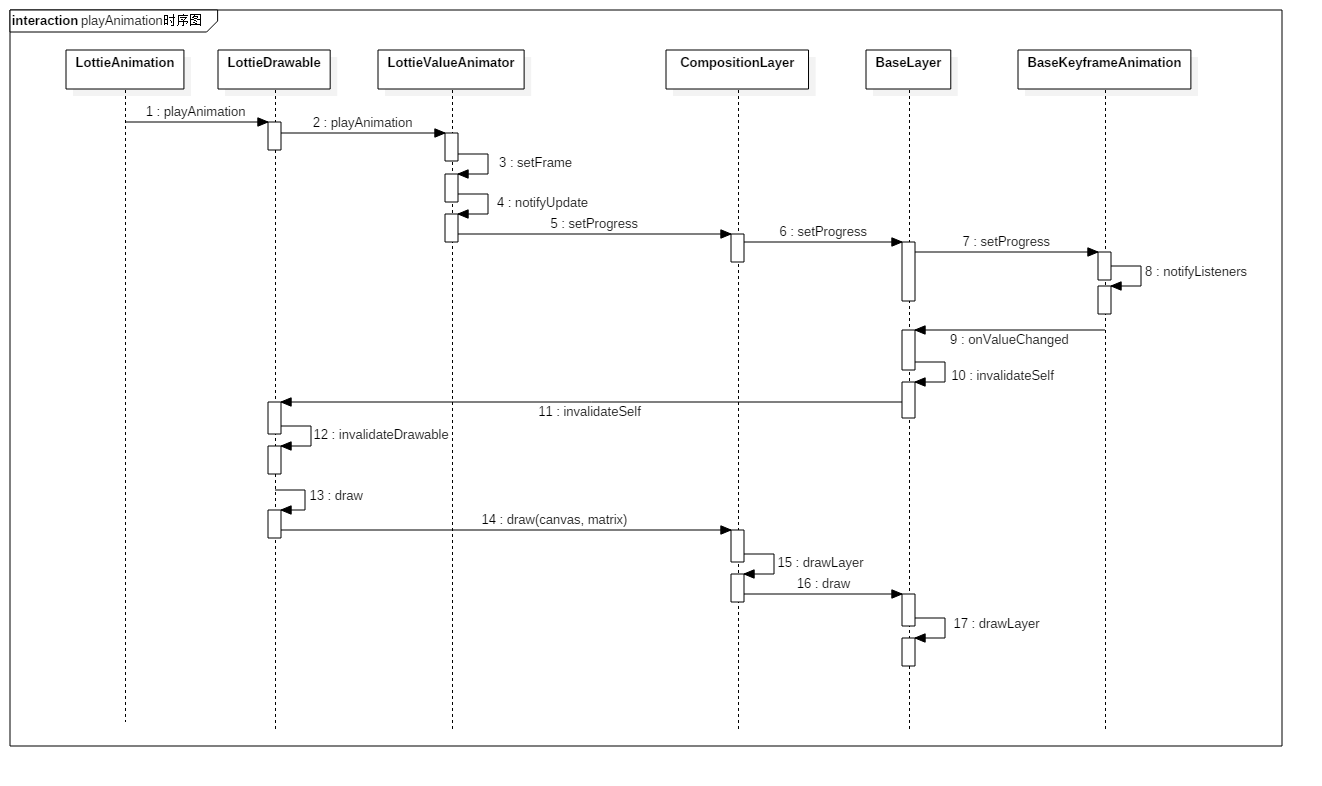
playAnimation时序图

playAnimation

播放动画会直接委托给 LottieDrawable 中执行,这里有一个继承 ValueAnimator 的子类 LottieValueAnimator 变量 animator,它用来控制整个动画的进度和更新。在 LottieValueAnimator 中,执行动画如下:

1
2
3
4
5
6
7
public void playAnimation() {
notifyStart(isReversed());
setFrame((int) (isReversed() ? getMaxFrame() : getMinFrame()));
lastFrameTimeNs = System.nanoTime();
repeatCount = 0;
postFrameCallback();
}

这里的代码逻辑是:

  • notifyStart 去通知为 LottieAnimationView 设置的监听器,动画开始
  • setFrame 设置当前帧数据
  • postFrameCallback 抛一个 callback 去计算下一帧的数据,最终回调到 Choreographer.FrameCallback.doFrame() ,在 doFrame() 中又会继续抛出下一帧的计算,并且设置当前帧和通知动画的进度,这样整个动画会持续地动起来。
setProgress

setFrame()doFrame() 中,进行设置关键帧的数据,然后调用 notifyUpdate() 通知当前动画进度改变,回调到 LottieDrawable 的 animator 添加的监听器中。

1
2
3
4
5
6
7
8
9
public LottieDrawable() {
animator.addUpdateListener(new ValueAnimator.AnimatorUpdateListener() {
@Override public void onAnimationUpdate(ValueAnimator animation) {
if (compositionLayer != null) {
compositionLayer.setProgress(animator.getAnimatedValueAbsolute());
}
}
});
}

animator.getAnimatedValueAbsolute(),这个会把当前 frame 和起始帧、结束帧计算 一个0~1 的插值,再通知顶层的 CompositionLayer 进度改变。

传递到各个图层,设置关键帧及属性值的进度

在 CompositionLayer 中,会遍历包含的 BaseLyaer,设置当前进度值,传递到各个图层:

1
2
3
4
5
6
7
8
9
10
11
12
13
14
15
16
@Override public void setProgress(@FloatRange(from = 0f, to = 1f) float progress) {
super.setProgress(progress);
if (timeRemapping != null) {
float duration = lottieDrawable.getComposition().getDuration();
long remappedTime = (long) (timeRemapping.getValue() * 1000);
progress = remappedTime / duration;
}
if (layerModel.getTimeStretch() != 0) {
progress /= layerModel.getTimeStretch();
}

progress -= layerModel.getStartProgress();
for (int i = layers.size() - 1; i >= 0; i--) {
layers.get(i).setProgress(progress);
}
}

在 BaseLayer 里,setProgress 时,先改变当前动画的属性值,再设置有蒙层的 mask 或 matter 和当前关键帧的进度:

1
2
3
4
5
6
7
8
9
10
11
12
13
14
15
void setProgress(@FloatRange(from = 0f, to = 1f) float progress) {
// Time stretch should not be applied to the layer transform.
transform.setProgress(progress);
if (layerModel.getTimeStretch() != 0) {
progress /= layerModel.getTimeStretch();
}
if (matteLayer != null) {
// The matte layer's time stretch is pre-calculated.
float matteTimeStretch = matteLayer.layerModel.getTimeStretch();
matteLayer.setProgress(progress * matteTimeStretch);
}
for (int i = 0; i < animations.size(); i++) {
animations.get(i).setProgress(progress);
}
}

这个 animations 是 BaseKeyframeAnimation 的列表,BaseKeyframeAnimation 是 Lottie 中定义的一套动画包括位移、缩放、旋转、透明度变化等。

回调通知动画变化

在关键帧 BaseKeyframeAnimation 中设置进度完后会通知动画数值变化:

1
2
3
4
5
6
7
8
9
10
11
12
13
14
15
16
17
18
19
20
public void setProgress(@FloatRange(from = 0f, to = 1f) float progress) {
if (progress < getStartDelayProgress()) {
progress = getStartDelayProgress();
} else if (progress > getEndProgress()) {
progress = getEndProgress();
}

if (progress == this.progress) {
return;
}
this.progress = progress;

notifyListeners();
}

public void notifyListeners() {
for (int i = 0; i < listeners.size(); i++) {
listeners.get(i).onValueChanged();
}
}

这个会回调到 BaseLayer 里,触发重绘:

1
2
3
@Override public void onValueChanged() {
invalidateSelf();
}
触发重绘

在 BaseLayer 里重绘会调用 LottieDrawable 进行重绘:

1
2
3
private void invalidateSelf() {
lottieDrawable.invalidateSelf();
}

最终会让 LottieDrawable 调用 draw 进行绘制:

1
2
3
4
5
6
7
8
9
10
11
12
13
14
15
16
17
18
19
20
21
22
23
24
25
26
27
28
29
30
31
32
33
34
35
36
@Override public void draw(@NonNull Canvas canvas) {
L.beginSection("Drawable#draw");
if (compositionLayer == null) {
return;
}

float scale = this.scale;
float extraScale = 1f;
float maxScale = getMaxScale(canvas);
if (scale > maxScale) {
scale = maxScale;
extraScale = this.scale / scale;
}

if (extraScale > 1) {
canvas.save();
float halfWidth = composition.getBounds().width() / 2f;
float halfHeight = composition.getBounds().height() / 2f;
float scaledHalfWidth = halfWidth * scale;
float scaledHalfHeight = halfHeight * scale;

canvas.translate(
getScale() * halfWidth - scaledHalfWidth,
getScale() * halfHeight - scaledHalfHeight);
canvas.scale(extraScale, extraScale, scaledHalfWidth, scaledHalfHeight);
}

matrix.reset();
matrix.preScale(scale, scale);
compositionLayer.draw(canvas, matrix, alpha);
L.endSection("Drawable#draw");

if (extraScale > 1) {
canvas.restore();
}
}

这里是把画布 canvas 和 drawable 的矩阵 matrix 传入到 CompositionLayer,通知所有图层绘制。

各个图层进行绘制

在 BaseLayer 的 draw 绘制过程中,会调用抽象方法 drawLayer,各个继承的子类会具体实现。

1
2
3
4
5
6
7
8
9
10
11
@SuppressLint("WrongConstant") @Override
public void draw(Canvas canvas, Matrix parentMatrix, int parentAlpha) {
if (!hasMatteOnThisLayer() && !hasMasksOnThisLayer()) {
matrix.preConcat(transform.getMatrix());
L.beginSection("Layer#drawLayer");
drawLayer(canvas, matrix, alpha);
L.endSection("Layer#drawLayer");
recordRenderTime(L.endSection(drawTraceName));
return;
}
}

其中在 CompositionLayer 里,它可能包含多个子图层的,所以这里会遍历所包含的子图层进行 draw。

1
2
3
4
5
6
7
8
9
10
11
12
13
14
15
16
17
18
19
@Override void drawLayer(Canvas canvas, Matrix parentMatrix, int parentAlpha) {
L.beginSection("CompositionLayer#draw");
canvas.save();
newClipRect.set(0, 0, layerModel.getPreCompWidth(), layerModel.getPreCompHeight());
parentMatrix.mapRect(newClipRect);

for (int i = layers.size() - 1; i >= 0 ; i--) {
boolean nonEmptyClip = true;
if (!newClipRect.isEmpty()) {
nonEmptyClip = canvas.clipRect(newClipRect);
}
if (nonEmptyClip) {
BaseLayer layer = layers.get(i);
layer.draw(canvas, parentMatrix, parentAlpha);
}
}
canvas.restore();
L.endSection("CompositionLayer#draw");
}

对于基本图层 SolidLayer,ImageLayer,NullLayer,ShpeLayer,TextLayer,会实现基类的 drawLayer 方法,完成该图层的具体绘制工作,比如在 ImageLayer 里,就是需要绘制图片:

1
2
3
4
5
6
7
8
9
10
11
12
13
14
15
16
17
18
@Override public void drawLayer(@NonNull Canvas canvas, Matrix parentMatrix, int parentAlpha) {
Bitmap bitmap = getBitmap();
if (bitmap == null) {
return;
}
float density = Utils.dpScale();

paint.setAlpha(parentAlpha);
if (colorFilterAnimation != null) {
paint.setColorFilter(colorFilterAnimation.getValue());
}
canvas.save();
canvas.concat(parentMatrix);
src.set(0, 0, bitmap.getWidth(), bitmap.getHeight());
dst.set(0, 0, (int) (bitmap.getWidth() * density), (int) (bitmap.getHeight() * density));
canvas.drawBitmap(bitmap, src, dst , paint);
canvas.restore();
}

各个图层根据当前改变的属性值和进度,绘制当前图层的效果,最终改变 drawable ,至此完成动画的改变。

Lottie 小结

优势

  • 设计师只用导出一份动画 Json,就能运行各个平台上,无需跟开发反复调试,非常灵活
  • 运营可配置,一次开发,后边可动态配置,实时替换动画效果
  • 可实现复杂动画效果,开发效率高,易于调试和维护

不足

有 mask、matters 时,有很大的性能影响

可以查看源码在 BaseLayer,是如何对有 mask 或 matte 进行计算的:

lottie_mask_1

如果不含 mask 或 matte,这里直接调用 drawLayer 就返回了,但是对于 mask 或 matte 会先进行 saveLayer,再去绘制 drawLayer。

在 saveLayer 中,可以看到这是个非常耗时的操作,需要分配和绘制一个 offscreen 的缓冲区,渲染的成本增加了一倍以上。

lottie_mask_2

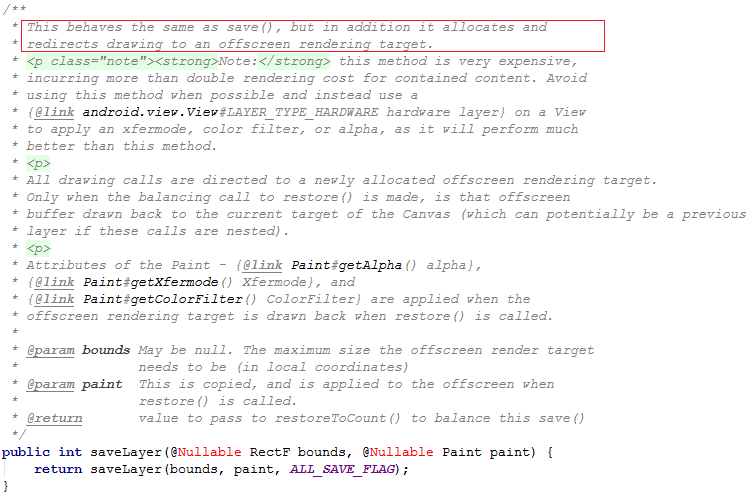
所以这里 mask 或 matte 的边界越小,性能损耗也会越小。

解码图片在主线程

查看 Lottie 获取图片的 ImageAssetManager 源码:

1
2
3
4
5
6
7
8
9
10
11
12
13
14
15
16
17
18
19
20
21
22
23
24
25
26
27
28
29
30
31
32
33
34
@Nullable public Bitmap bitmapForId(String id) {
Bitmap bitmap = bitmaps.get(id);
if (bitmap == null) {
LottieImageAsset imageAsset = imageAssets.get(id);
if (imageAsset == null) {
return null;
}
if (delegate != null) {
bitmap = delegate.fetchBitmap(imageAsset);
if (bitmap != null) {
bitmaps.put(id, bitmap);
}
return bitmap;
}

InputStream is;
try {
if (TextUtils.isEmpty(imagesFolder)) {
throw new IllegalStateException("You must set an images folder before loading an image." +
" Set it with LottieComposition#setImagesFolder or LottieDrawable#setImagesFolder");
}
is = context.getAssets().open(imagesFolder + imageAsset.getFileName());
} catch (IOException e) {
Log.w(L.TAG, "Unable to open asset.", e);
return null;
}
BitmapFactory.Options opts = new BitmapFactory.Options();
opts.inScaled = true;
opts.inDensity = 160;
bitmap = BitmapFactory.decodeStream(is, null, opts);
bitmaps.put(id, bitmap);
}
return bitmap;
}

这里如果没有设置图片代理,则直接解码图片。如果有设置图片代理,则在代理监听里获取图片。

1
2
3
4
5
6
7
8
9
10
11
12
mLottieAnim.setImageAssetDelegate(new ImageAssetDelegate() {
@Override
public Bitmap fetchBitmap(LottieImageAsset asset) {
try {
FileInputStream fileInputStream = new FileInputStream("/sdcard/data/images/" + asset.getFileName());
return BitmapFactory.decodeStream(fileInputStream);
} catch (Exception e) {
e.printStackTrace();
}
return null;
}
});

这俩种方式,都将在主线程中调用,第一次都会从文件中解码,之后会直接从缓存中获取。对于一些 Android 低端机可能无法播放动画,甚至引发 ANR;可能 Lottie 更多考虑的是没有图片或图片很少的情况,比如一些矢量动画,这种性能会很好。

知道是不会有人点的,但万一被感动了呢?