用 Weex 跨平台框架完全开发一款 APP,终端只搭建基础能力,前端完成所有 UI 界面和业务开发。所以接下来总结使用 Weex 开发过程中的一些心得。
Weex 介绍
Weex 是一个使用 Web 开发体验来开发高性能、可扩展的原生应用的框架。使用 Vue、Rax 为上层框架,遵循 W3C 标准实现了统一的 JSEngine 和 DOM API,并用同一套代码构建 Android、iOS 和 Web 三端一致的应用。
我们可以通过前端框架 Vue.js 和 Rax 编写,再用命令行工具将 Weex 文件生成对应的 JS Bundle。之后可以将生成的 JS Bundle 部署到服务端做动态下发到终端。
在各个客户端里,Weex 会准备一个 JS Framework 的执行环境,打开 Weex 页面时,就会执行该页面的 JS bundle,并将执行过程产生的各种命令发送到客户端进行界面渲染,数据通信及用户交互响应等。
Why Weex
对于开发一款新的 APP,自然是想节省人力、尽快上线,于是瞄准现有的跨平台框架,有 Facebook 推的 React Native,google 推的 flutter 等,可最终为什么团队选择了 Weex 呢?
以下是目前最流行的三款跨平台框架对比:
| weex | react native | flutter | |
|---|---|---|---|
| 目标 | Write Once, Run Everywhere | Learn once, write anywhere | Write once, deploy everywhere |
| 语言 | vue.js,rax | react | dart |
| ui组件 | 系统Native | 系统Native | skia引擎绘制的专有widge |
| 性能相对h5 | 好 | 好 | 很好 |
| 最新版本 | 0.18 | 0.51 | preview 1.0 |
| 支持版本 | API14+ | API16+ | API 16+ |
| 开源协议 | apache | MIT( Facebook BSD+Patents ) | BSD |
| 学习成本 | 容易 | 一般 | 较难 |
| 社区活跃/文档建设 | 一般 | 活跃 | 活跃 |
对于 react native,已经是比较成熟的一套方案了,但是不足之处有:
- 法务风险:之前的开源协议是 Facebook BSD+Patents,虽然现在已经改为了 MIT。
对于 flutter,是 google 新推出的一种方案:
- 目前还在 beta 版,未发布正式版,但即使这样,也已经引起了许多开发者使用。
- 前端框架语言:Dart,对于前端同学需要比较大的学习成本。
而对于 Weex 方案:
- 没有 Facebook 的法务风险,已经在天猫、飞猪等产品上实践很久,是一套较为成熟的解决方案。
- 上层使用的是 Vue 框架,前端同学可以无缝衔接,上手很容易。
所以在经过和前端同学商讨后,决定选择 Weex 作为开发我们新 APP 的跨平台框架。
Weex 整体架构
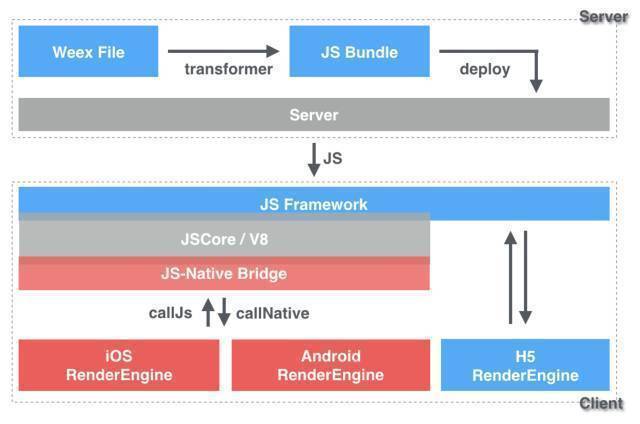
Weex 的整体架构如下所示:

Weex 整体分为俩大块,一部分是 Weex Core 引擎,来自几个 so:libweexjsc.so、libweexjss.so 等,另一部分是 Weex 提供的上层 SDK。
Weex Core 引擎:
- 在 libweexjss.so 中,Weex 封装了 V8(Android)或 JavaScriptCore(iOS),准备了一个 JS 的执行环境,在初始化时就加载 weex-main-jsfm.js 作为运行的 JS 框架,管理 Weex 实例的运行,并负责加载 JS Bundle 时构建 Virtual DOM 树等。
- 在 libweexjsc.so 中,Weex 负责对 Virtual DOM 树进行 render 和 layout,构造真实的渲染树,并通过 Bridge JNI 桥梁调用 Native 的渲染指令。
Weex Framework:
- 在 Weex 的上层 SDK 中,WXBridge 是与 Weex Core 引擎交互的桥梁,并通过 WXBridgeManager 分发到 WXRenderManager、WXDomModule 等地方。
- WXDomMoudle 接收 Weex Core 调用
WXComponent控件的方法。WXRenderManager 负责将任务抛到 UI 线程渲染,注册和销毁 Weex 的控件WXComponent,并管理当前页面的实例WXSDKInstance。 - WXComponet 是 Weex 用来扩展实现 Native 控件,提供给 JS 端调用原生控件的能力。WXModule 是扩展非UI 的特定功能,比如网络、存储等。
Weex 的渲染
对于 Weex,想必大家最关心的是我们使用 Vue.js 开发的 JS Bundle,是如何转换显示到终端界面上的,接下来重点分析 Weex 渲染这块的逻辑。
Weex 的渲染是将服务端下发或本地加载的 JS Bundle,加载到 JS 的引擎中执行,根据 Virtual DOM 建立一个渲染树(Render Tree),遍历创建各个节点的 Render Object,再进行 layout、添加事件、绑定数据等,最终完成 Weex 页面的渲染。渲染的架构如下所示:
接下来重点分析以下俩个步骤:
- Weex 加载 JS Bundle
- Weex 页面渲染
JS Bundle 加载
经过 weex-loader 生成的 JS Bundle 以 String 形式加载到内存中,可以通过 url 网络请求获取,也可直接从本地文件中加载。
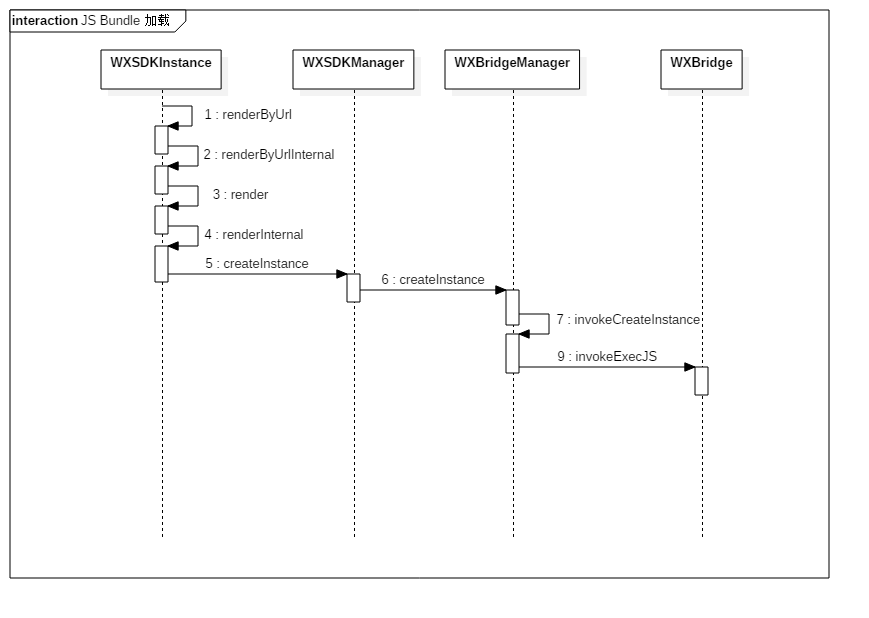
- 通过 url 加载时,会获取 IWXHttpAdapter 的实现类(默认是 Weex 的
DefaultWXHttpAdapter)去请求。无论是网络请求还是本地加载的 JS Bundle 都会通过字节流以String形式保存在内存中。 - 注册当前实例,并把当前实例加载的 JS Bundle 的 js 代码以
String类型通过 WXBridge 传入 WeexCore 执行创建Instance。
页面渲染
Weex 的页面渲染流程可以分为三个部分:JSFramework 构建 Virtual DOM,WeexCore 构建渲染树,终端接受渲染指令绘制每个节点的 View。
构建 Virutal DOM
在初始化 Weex SDK 时,就会调用 initJSFramework,加载 weex-main-jsfm.js 在 V8 引擎上执行。在 Weex 页面创建实例时,加载对应的 JS Bundle 运行,并提供 define()和bootstrap() 函数调用。define() 用来注册模块,bootstrap() 会编译主要的模块为 Virtual DOM,并发送渲染指令给 Weex Core 的 JSC(libweexjsc.so) 渲染引擎。
生成 Render Tree
生成的 Virtual Dom 会以 Json 数据传入渲染引擎中,生成 Render Tree,再调用对应的 Native 命令进行真实 UI 的渲染,时序图如下所示:
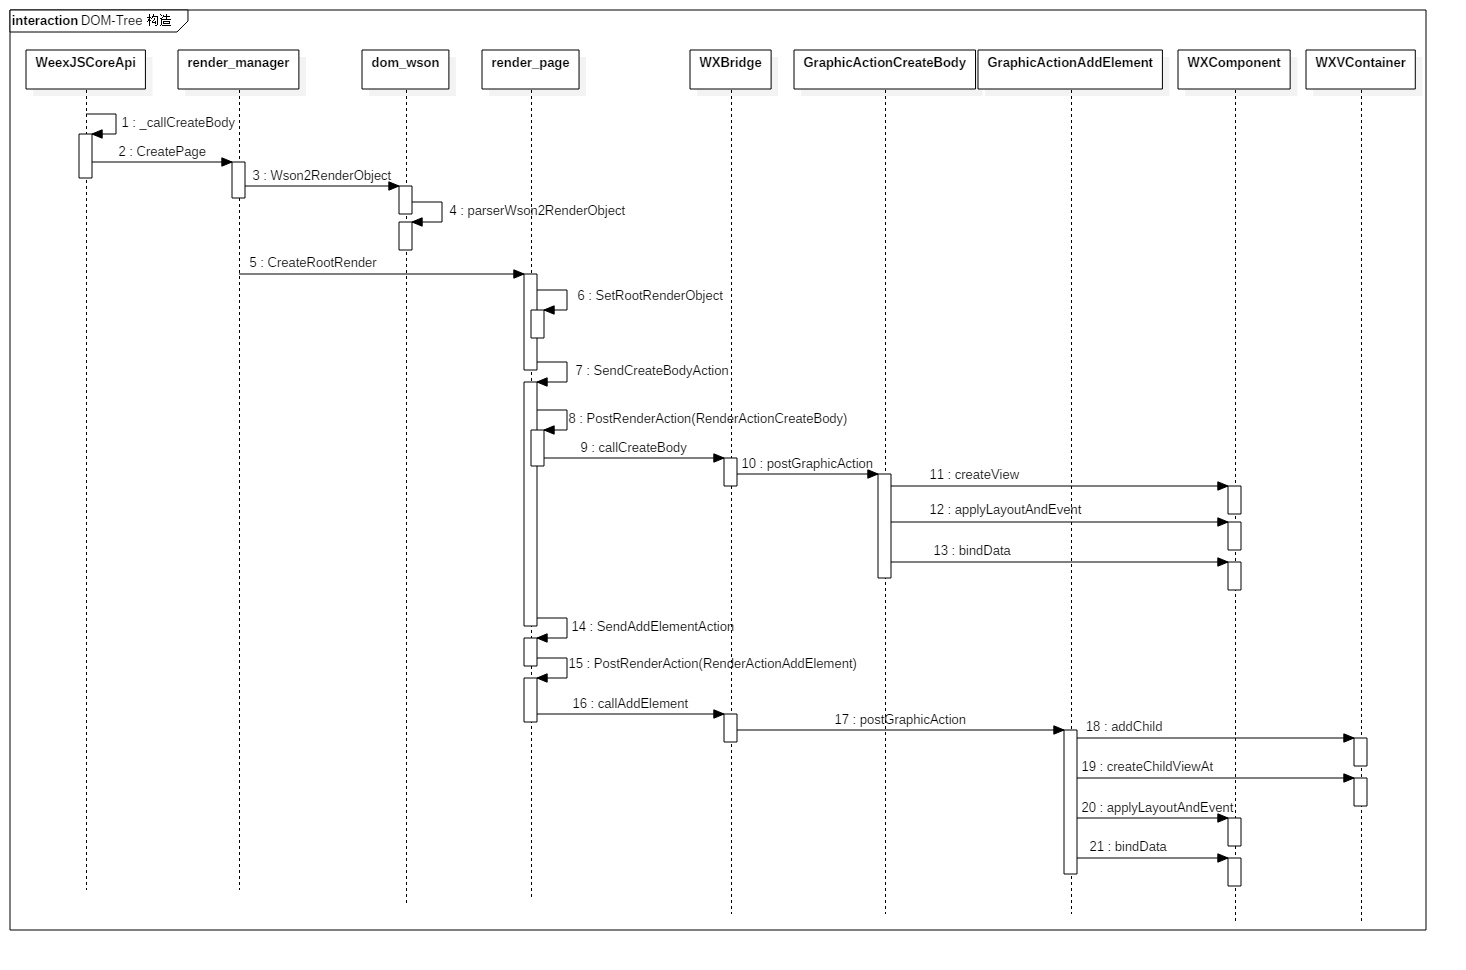
DOM Tree 的渲染,可以从 createBody 开始分析,在 WeexJSCoreApi.cpp 中如下:
1 | void _callCreateBody(const char *pageId, const char *domStr) { |
传入某个页面 Id,及该页面的 domStr,调用到 RenderManager 中:
1 | bool RenderManager::CreatePage(std::string pageId, const char* data) { |
在创建页面时,会先用 parserWson2RenderObject 把 data 转换为渲染的对象:
1 | //dom_wason.cpp |
Wson 解析会把 DOM Tree 的 wson 格式解析成一个渲染树,然后开始在 CreateRootRender 渲染根节点。
1 | bool RenderPage::CreateRootRender(RenderObject *root) { |
这里先设置了 root 节点的属性,再发送一个 SendCreateBodyAction 的 Action:
1 | void RenderPage::SendCreateBodyAction(RenderObject *render) { |
可以很清楚的看到,根据传入的 root 节点,抛一个 RenderActionCreateBody,再遍历各个子节点,发送各个子节点的渲染 Action。
在 RenderActionCreateBody 中,会通过 WXBridge 调用 Java 层 callCreateBody:
1 | void RenderActionCreateBody::ExecuteAction() { |
在子节点的渲染时,会抛一个 RenderActionAddElement 通过 WXBridge 调用 Java 层 callAddElement 添加子节点的元素:
1 | void RenderActionAddElement::ExecuteAction() { |
Native 绘制 View
在 Java 层的 WXBridge 中接收 JSC 渲染 DOM Tree 时调用的俩个 JNI 方法:
- 创建根节点:
callCreateBody,会通过RenderHandler抛出GraphicActionCreateBody切换到 UI 线程执行。 - 添加子元素:
callAddElement,抛出GraphicActionAddElement在 UI 线程执行。
在 GraphicActionCreateBody 中,创建 WXComponent 的 View,设置 layout,添加响应时间、绑定数据等,并设置为当前页面实例的根 view。
1 | public void executeAction() { |
在 GraphicActionAddElement 中,会添加到父组件(继承 WXVContainer)中创建,并设置该元素对应的 WXComponent 的 layout、event 和 data。
1 | public void executeAction() { |
当所有 View 创建完后,就会触发 GraphicActionCreateFinish,通知当前页面创建完毕,渲染成功:
1 | public void executeAction() { |
对比 Native 渲染
从上边对渲染流程的分析,我们可以知道对于 Weex 来说,所有的渲染流程最终都会调用到 Android 原生控件的渲染,Vue.js 写的一些组件都会映射到原生 Native 控件上。
对于 Weex 的渲染效率,相对原生来说多了一些耗时的地方:
- 对 Virtual DOM 的解析和生成
- 渲染时,有大量的、频繁的 JSS、JSC 和 WXBridge 的通信。
Weex 的实践总结
Weex 的局限
Weex 为了提升扩展性或减包,提供的组件和能力是比较局限的,我们需要根据业务的需求去深度定制一些 module 的能力,或扩展一些 adapter 的实现。以下来讲讲 Weex 组件的一些局限。
网络
Weex 提供的网络 module 是 stream 模块,底层实现是使用 HttpURLConnection,不足之处有:
- 在发起网络请求时,设置了固定的 3 个线程池。
当然由于 Weex 的高扩展性,在 stream module 这里抽象了一层接口 IWXHttpAdapter,我们只需要实现这个 adapter,在初始化时注册一下,就可以替换掉 Weex 本身实现的网络请求。
存储
Weex 实现的存储 module 是 WXStorageModule,最终存储的是 SQL 数据库,但这里有个比较大的局限是:
- key 和 value 都不允许为 null 或 “”。
在一些存储数据的情况下应该要允许 null 或 “” 的存在,所以在 storage module,我们也需要定制这个点。
图片
Weex 加载图片有俩种方式:
- local 开头的资源,image 组件将从 drawable 资源文件夹加载,不支持本地文件 File 方式加载。
- 网络 url 的资源:Weex 没有具体的实现,但提供了图片加载的 adapter,需要业务放根据需求自定义实现。
一些 bug
在 Weex 开发过程中,遇到了一些常遇到的 bug,这里总结一下。
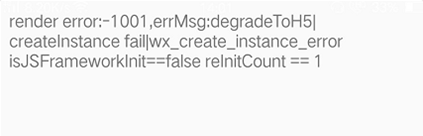
wx_create_instance_error
在开发时或外网用户反馈,经常遇到的一个问题是 error:-1001,errMsg:wx_create_instance_error,其中一个路径如下所示:
-1001 这个问题基本都是创建 instance 失败,因为 weex 的 framework 还未初始化好,导致用户看到界面是白屏的。
问题原因:
在启动时我们就会初始化 Weex 的 sdk,看下边在 Weex 的实现上,会使用 JSBridge 的线程异步执行 initScriptsFramework:
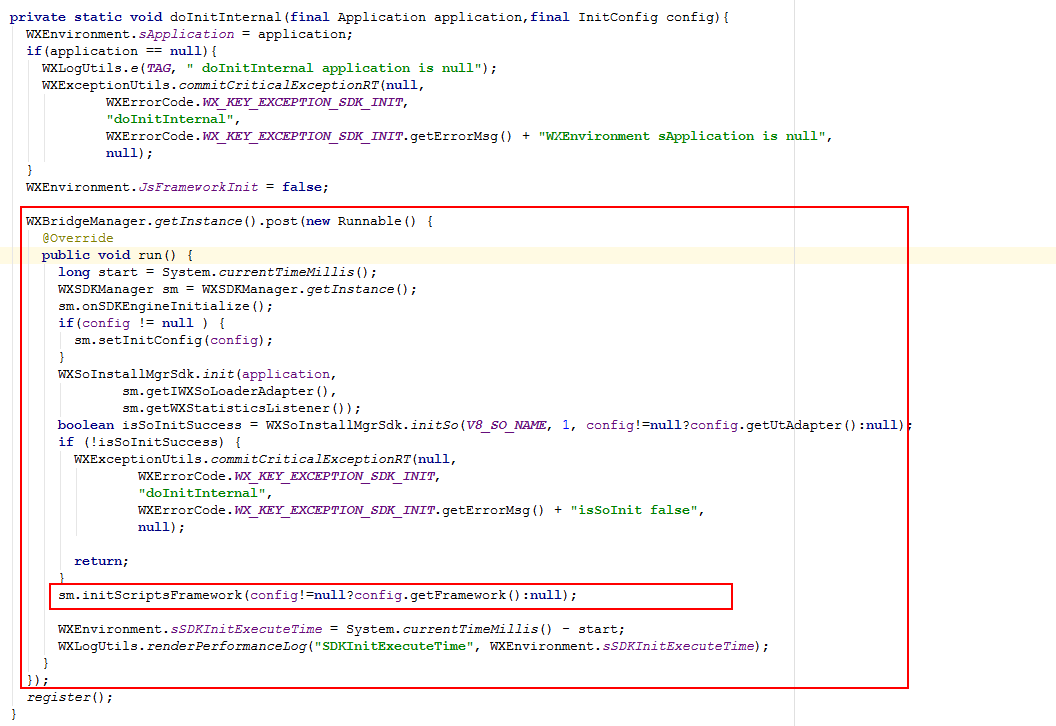
当我们进入到 Weex 页面时,会先创建页面的实例:

这里,判断当前的 JSFramework 是否初始化好,如果还未初始化,则会抛 -1001 创建实例失败的错误。
可以得出这个问题的原因是:异步初始化 JSFramework 还没执行完,就进入 Weex 页面渲染,导致创建实例失败。
解决方案:
1、把页面渲染抛到 init JSFramework 的 JSBridge handler 里,等到队列执行时,再把 render 抛回 UI 线程渲染,保证 Weex 初始化 JSFramework 和页面渲染是同步执行。
2、监听 Weex 渲染过程的 onException,出错时添加 rdm 主动上报,去掉错误提示。同时可以根据 erroCode 为 -1001 的,重新加载页面。
3、当 Weex 页面渲染失败时,考虑添加 H5 的降级方案,让用户正常使用。
JSCallback 回调
在给前端提供第三方登录 module 时,给前端回调使用了 invoke 和 invokeAndKeepAlive 俩种方式。
invoke:只回调一次,回调完成后就会被销毁。invokeAndKeepAlive:保持长连接,可以回调多次。
这里要注意的是,对于 invokeAndKeepAlive,保持长连接的是创建时的对象,对于多次调用时,会创建多个 JSCallback,此时如果一直使用第一个 JSCallback 进行 invokeAndKeepAlive 回调,前端之后的调用是收不到通知的。
接入总结
以下来谈谈 APP 接入 Weex 的优点和不足。
优势
- Weex 上手非常简单,官方有提供专门的网站,编写前端界面,只需要下载 demo 应用,再扫一扫就能远程加载编写的 JS Bundle,实时展现在终端上。
- 对终端很友好,Weex 提供的接口很简洁易懂,支持高可扩展性,对于一些基础能力很容易进行深度定制,比如网络、存储、图片等。
- 对前端同学开发无缝衔接,使用的 Vue 框架,契合前端的技术栈,编写结构清晰,上手容易。
- 因为 Weex 支持高可扩展性,所以本身提供的能力有局限,对于首次接入 Weex,需要构建和完善很多基础轮子,但对于稳定后的开发,只需要专注前端界面和业务逻辑的实现。
不足
- JS 层和 Native 层通信有时延,调用过于频繁时,效率会比较低
- 对 Gcanvas、AR/VR、视频等富交互的复杂组件无法很好的支持
- 人力沟通成本增加,以前是 Android 和 iOS 俩端各自开发,分好模块后就可以专注自己模块的实现。但对于这种跨平台框架,虽然减少了俩端开发的人数,但增加了重构 UI 的开发,和前端对业务逻辑的实现,在沟通上的成本是提高了。